
Today's post is inspired by the recent three three-day food logs I spent the past couple nights evaluating. I try to evaluate each individuals diet differently taking into account their daily schedule, if they have kids, and so many other factors, but in addition whenever I get to evaluate multiple logs at once it allows to gain a larger perspective of the average Americans daily diet. In these three food logs the reoccurring pattern I picked up on immediately was the severe lack of vegetables. I am not saying this is the only problem I saw in the diets because I did see an over reliance on starchy carbohydrates or sugars, and a lack of protein at every feeding, but by far an large the biggest gap was in the amount of veggies being consumed. For those of you who are removed in your relationship with veggies, they are they leafy odd color food you pass on you way to the frozen food asile. Anyway I'd rather take a positive approach to helping fix this problem, so rather than blaming the individuals themselves for not eating more vegetables because they just don't want to I'd like to assume that people aren't eating more veggies because they simply aren't for sure how to go about incorporating more veggies in their diet other than eating straight-up raw vegetables (not my favorite either just for the record). In response to my assumption I tried to develop a list of strategies that will allow you to incorporate more veggies using simple and convient methods.
|
The purpose of this post is not to bully anyone or make anyone feel inferior, but rather to raise everyone's awareness about a cognitive process that takes place on a daily basis, almost in a routine manner for most of the population. Self-Rationalization (SR) refers to the psychological defense mechanism that plays, formost, a subconscious role in the decision making process. SR is the process by which perceived controversial behaviors or decisions are locally justified and explained in a logical manner in order to avoid recognizing a true explanation that might might be unacceptable to the individual or their peers. It is a powerful defense mechanism and one I see employed all to frequently in the training profession from my own clients. Check the video below for some examples of self-rationalizing talk and a few good laughs especially if you yourself our a trainer. The purpose of exercise is to place stress upon the body in order to create a physiological adaptation. This adaptation is specific to the type of stress used and the particular system being stressed. While this is a simple concept to understand, what is not well understood is the fact that the stress is only the catalyst for the adaptation. The key to insuring that the adaption fully takes place is rest and recovery. So one way of thinking about this process is as a reaction which would look something like the following: system + stress + rest -> result (adaptation)  The Acromioclavicular Joint (AC) is often a problem area for many individuals, both in athletic and general populations. The AC joint is located at the top of the shoulder formed by the junction between the acromion and the clavicle. This joint is very much responsible for giving us the ability to raise our arms above the head. The AC joint is a gliding synovial joint which is important because by acting like a strut it aids the movement of the scapula leading to a greater range of arm motion. Unlike the glenohumeral joint which has the benefit of being stabilized by a combination of ligaments and muscles (rotator cuff), the AC joint must solely rely upon ligaments to prevent any kind of extraordinary mobility this is due to the fact that there is no muscle that crosses directly over the joint. The AC Joint relies on three ligaments specifically to maintain proper stability within the joint these are the Coracoclavicular ligament, Coracoacromial ligament, and the Acromioclavicular Ligament. To the left is a model picture of the Acromioclavicular Joint. Due to this reliance on ligaments alone to stabilize the joint one can safely assume that it would take very little to cause the joint to become excessively mobile.
The most often onset of AC Joint issues is correlated with a traumatic injury involving some kind of high force impact. Occurrences of this nature are most commonly seen in physical contact athletes such as Mixed Martial Artist, Hockey, Football, and Lacrosse. Ligaments are the most elastic tissue in the body and once they have been pulled on by externally applied forces the ligament becomes permanently stretched leading to the increased mobility we observe. More common though and probably more relevant to the general population is the onset of AC Joint issues in a gradual manner. In general this onset slowly develops as an individual loses scapular stability in addition to experiencing shortness in the pectoral muscle primarily the minor pec this leads to an anteriorly tilted scapula that is slightly winged out. This dysfunction leads to some major issues between the acromion and the clavicle most commonly presenting in increased separation between the two. Individuals suffering from AC Joint pain may also be lacking in thoracic mobility causing them to compensate and gain back their lack of ROM by overusing the scapula. When trying to correct such issues you must take into account all possible dysfunction and focus on slowing improving upon each issue. It is not relevant though what has brought about the issues it is only important that you focus your attention on improving scapular stability, increasing lower trapezius strength and anterior serratus strength in order to pull the acromion back in working order with the clavicle. One should also employ foam rolling and stretching in the pectoral muscles to decrease anterior forces. Now that we have discuss what the AC Joint is, what are some of the dysfunction and causes of this joint, and how they should be addressed it is time to offer some considerations to be taken into account when training to train around such an injury. Typically there are a lot of variable factors to be taken into account when training an individual with AC dysfunction, but three good rules I’d start with is avoid adduction of the arm especially in a horizontal path, do not apply any kind of direct contact or force onto the joint as most individuals experience pain to the touch, and lastly avoid any kind of full extension with the humerus. These are simple guidelines one can use to train around issues involving the acromioclavicular joint. Well now that you have had your crash course in AC Joint dysfunctions and possible ways to both improve them and train around them you are ready to head off to the gym and keep a close watch on the all important AC Joint. 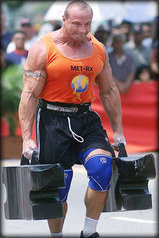 The number of individuals performing the Farmer’s Walk in average gyms is slowly increasing and as I see the number of users increase I see a slow, but steady watering down of proper form. The same decline that has been seen with other classic lifts, such as the bench press and squat. I am in no means saying that the Farmer’s Walk is not for the everyday average gym goer because in my opinion any body from any population can and should work the Farmer’s Walk into their training program. The benefits it offers are enormous. From the challenges it places on grip strength to the demand it creates on the upper back, hips, legs, and especially trunk not one is left unscathed. Renowned Canadian spine researcher Stuart McGill even called the farmer’s walk and it’s many other variations a “moving plank” which gives you an idea to the huge amounts of benefits this lift contains.
But, the biggest problem with such a simple lift that offers loads of benefits is that many try to imitate the movement, but fail miserably because they have not been properly coached through the movement. A few very common mistakes I see with the average performer are exaggerated forward head and rounded shoulder, shortened gait length, limited hip mobility, and way to much time spend in a unilateral stance. To begin we must fix our posture especially are excessive cervical anterior tilt and thoracic rounding. This improper position of the head places to much stress on the intervertebral discs. Placing a load held in the hands with the cervical spine in this position just adds to this stress. In addition the rounded thoracic positioning is the giving way of weak scapular retractors which further rounds the upper back. Doing all this poor posture under load just re-ingrains lousy postureThe fix for this problem is simply done in a two step process. First the correct cervical and thoracic spine mobility must be established. Second, you must also progress from restored thoracic spine mobility to proper thoracic extension The second most crucial point when performing this exercise is to watch time spent in a unilateral stance as well as the length of gait. This unilateral stance is marked with a shuffling gait often associated with increases in weight. This shuffling is a combination concurrent hip adduction and internal rotation which negates a lot of glute activity going on during the carry. This gait also robs the carrier of the incredible core challenge this lift elicits because the more amount of time spent in a unilateral stance places more emphasis on the oblique, quadratus lumborum, and hip abductors while trying to maintain the pelvis and trunk in a correct position.To insure you avoid such a gait be sure to focus on equal steps of length and picking up each foot when taking a stride. To close I hope you have a better understanding of the proper farmer’s walk technique to be used. This lift is a staple when it comes to metabolic work and overall general preparedness, but with a few tweaks and technical proficiency it can allow for a vast number of benefits. In today's "Information Age" one can and will feel overwhelmed by the vast amounts of knowledge and differing opinions that is available to you in newspapers, magazines, and the internet. Now I realize this might seem a bit hypocritical seeing as intellectual fitness is part of this information machine, but our chosen role in this machine is to properly inform individuals on correct and effective ways to train as we state on our home page we believe in practical, purposeful, and effective methods. While realizing how much information is out there about proper exercise programming and how easy it is for an individual looking for effective methods of training to get caught up in complicated set and repetition schemes and orthopedically unsafe workouts. The truth to the question on proper programming is any program that offers progressive overload to stimulate further progress done with proper technique and intensity will produce results.
So before an individual can concern themselves with any of these complicated set and rep schemes or barbell squats on a stability ball (a bit much don't you think). One must have a proper foundation for there program and the foundation of every program is the repetitions performed meaning if one is using bad form on repetition then the whole program is useless. There are five coaching points we use at intellectual fitness to insure that what we call the "Perfect Repetitions" is performed. These five coaching points are minimizing momentum, pause when the muscle is fully contracted, emphasize the lowering portion of the repetition, body position and leverage, and maintain constant tension on the muscle through proper range of motion. The purpose of a repetition is to place a stimulus on the muscle that will elicit fatigue by focusing on these five points you will achieve the intended purpose of the repetition. 1. Minimize Momentum Moving a weight too quickly will result in the weight gaining speed and eventually moving on its own removing the stress placed on the muscle. This will make the exercise easier and increase the likelihood of an injury to occur both of which are things an individual should try to avoid while training. One must take great care in the execution of the exercise placing emphasis on raising and lowering the weight in a slow and controlled manner. This does not assume that the will never me a moment when one tries to lift the weight will all out effort because as the exercise continues through the strength curve, which is the varying amount of maximal force the muscle is capable of producing in relation to the angle of the joint the muscle is attached to, the muscle will fatigue to the point where the force applied is not much more than the resistance it is overcoming. At this point any attempt to push or explode through this point will result in the weight continuing to move at the same speed. This means that one must hold back on force output at the beginning of the set, but as the set continues and the muscle fatigues the repetitions will be performed will greater effort while the speed of the motion does not increase until the effort is maximum and the movement is very slow to non-exsistent. These events follow the Size Principle of Muscle Recruitment which states it is the INTENT to raise the weight fast that is the key to activating fast-twitch fibers and developing explosive power. Not that the weight is ever actually moving at a high rate of speed. If the weight can be moved fast than it is not heavy enough to stimulate maximum power and strength gains. So when practiced a weight should be lifted in at least one to two seconds any thing faster means the weight is being thrown and throwing weight around does nothing to improve strength or power. 2. Pause When the Muscle is at a Point of Full Muscular Contraction Once one has raised the weight in a slow controlled manner in a effort to minimize momentum thus making the repetition harder and safer the individual should pause for at least a count of one in the fully contracted position or top of the exercise. This serves two purposes first it insures that there is little to no momentum in the exercise second it proves to the coach that the weight was lifted in to position and not thrown there. This technique is also called peak contraction and is a form of an isometric contraction and since it is important to work all three types of a contraction to completely fatigue the muscle it is important to make sure and practice this isometric position which will make the lift more effective and efficient. 3. Emphasize the Lowering or Concentric Phase of the Repetition. Lifting the weight is usually what most individuals feel is equal to one repetition however this is completely incorrect. The lifting or concentric portion of the rep is only half of the actual repetition. The second half of the repetition is the lower or eccentric portion of the repetition which is also the portion of the repetition we at intellectual fitness place great emphasis on because if properly used this eccentric portion can be used to make the biggest gains in strength and size. During the eccentric portion of the repetition your muscle is able to actually hold a load that is 40% greater than the load it can lift the reason for this is not truly understood all though the best explanation we have used to explain is that because there is less friction between the myosin and actin filaments than during the concentric portion do to the filaments sliding against each other which though this friction is very small it still creates added resistance so when it is removed as it is during the lowering phase of the repetition the strength of the muscle increases greatly. But the problem arises then how do you apply a greater load during the lower portion of the repetition when you are originally limited by the much weaker concentric portion of the repetition. This problem can be solved in to ways one you have a spotter add weight to the load before you begin to lower it, this isn't really practical and takes extra time which makes it inefficient, or you can increase the length of time the muscle is under the load. The latter of the two options is the most practical and is what we recommend at intellectual fitness. Thus we emphasize that the lowering portion should take any from 3-5secs to lower it any thing faster is dropping the weight again making the exercise easier and more dangerous. 4. Be Aware of Body Position and Leverage In any exercise one can improve their leverage in an effort to make the lift easier, but in turn this makes the lift less productive. So remember with the right leverage one could lift the world. Remember that the point of a repetition is to place a stimulus on the muscle that will produce fatigue. So an individual should position their body in such a way that the leverage creates the most difficult but allows for the greatest range of motion within both safety and comfort. 5. Constant Tension This coaching point is one that seperates the most skill trainees from the beginners. When one performs an exercise the muscle should be forced to work throughout the entire range of motion under a constant load. This isn't usually the case when most trainees lose their concentration on the rep and focus more on the completion of the set so they seek some moment of comfortablity by resting part way through the rep or bouncing the weight off of the rack. One should make the greatest effort to keep constant tension on the muscle through as many repetitions possible although we do understand there are moments in a set when you need a short pit stop to gain the strength to finish those last couple reps of the sets. This allows you to fatigue your muscle more efficiently and effectively. If all of the above coaching points are followed you will have performed a Perfect Repetition. The final point we want to make is that one should focus on rep replication meaning that one repetition should not differ from the next and every repetition is the most important rep. If all these points are followed the foundation of your program will be effective thus translating to progress no matter what kind of fancy programing you employ. So instead of searching for the newest latest training scheme take a step back and re-assess your foundation: The Repetition! Grip is often a much discussed topic when it comes to various exercise techniques. I tend not to get to caught up in it myself especially coaching clients. I mean when I am just beginning to teach an individual how to properly press or row I am usually more concerned with teaching them the foundations of the overall movement, such as maintaining proper scapula position at the top of a row, while keeping a packed neck, and avoiding humeral extension rather than what particular grip their using. I often here claims from a wide variety of individuals including other fitness professionals about how using this particular grip on an exercise versus the other grip activates such and such more percentage of this and this part of a muscle. Now while studies have shown that foot placement, angle of the movement, and hand position can all affect percentages of recruited muscle fibers in a given area I think for the most part individuals and coaches would be better off insuring the movement as a whole is perfected before starting to add variations in an effort to get more muscle fiber recruitment in a certain area.
I do however have one particular area of my programming in which I do get very specific about which grip is to be used and this is with the majority of pressing movements. I prefer that my clients do a good amount of their initial pressing movement with neutral hand positions. This is what I refer to as the position between a supinated wrist and a pronated wrist where the palms face inward toward one another. I sometimes allow my more experienced clients to use a hybrid position where the wrist is pronated to about a 45 degree angle to the contact of stability (this is what I refer to as the bench or ground depending on your orientation to gravity and the exercise being performed). Just about every client I have programmed for has asked me why I prescribe this hand position over the much more popular and more frequently practiced pronated grip (palm is facing away from you). The initial question asked every time is "does this work a different part of my muscle". Now while changing hand position will shift the percentage of muscle fibers recruited within the stimulated muscle, I often don't share that with them because I do not want them getting into a mindset that they need to do 6sets of a pressing motion all with various hand positions in order to sculpt the most beautiful well rounded muscular physique. I mean come on last time I checked your goal sheet you didn't put down that you want to be the next Mr. Olympia. While grip variations and angle adjustments are great for a change of pace for most of my clients I want their focus on the holistic movement not what part of their muscle is being innervated. So normally I lie to them (its for your own good people don't hate). I tell them no it is not because it works a different muscle or part of a muscle, the reason I have you use that hand position is because it will end up saving years of wear and tear from being piled on to your shoulders. So let me explain my explanation a little further so everyone understands why a neutral grip hand position is more beneficial to shoulder health than a pronated grip hand position. Now I know I have made the focus of this post the differences in hand positions but let me let you in on a little secret really I could care less where an individuals hand is position during a pressing movement. What I really care about is the degree of the angle of abduction from the elbow to the side of the body. You see the further the arm moves away from the body the greater the degree of external rotation in the shoulder. When the shoulder is forced to maintain a high degree of external rotation for a long period such as during a set of the bench press with the arm abducted from the side of the body more than 45 degrees it places much stress on your rotator cuff to stabilize the head of the humerus in its very shallow socket on the glenoid. Now add increased load to that position such as two 45 pound plates in the bottom position of the bench press and you have a bad situation for any body lacking proper strength in the rotator cuff (which is a large amount of the General Population Clients I see). Due to this situation I find myself being very particular about what angle my clients abduct their arm from their side to perform a pressing movement. You are probably think but wait you were just talking about hand positions and now you have jumped to the angle at which the arm is abducted aren't those two different factors that play a role in exercise technique. Well yes they are two separate factor that are not directly related. You can maintain pronated grip with keeping the angle of arm abduction in a press very small, such as during a close-grip bench press. But what I have found is that during dumbbell pressing movements whether they be horizontal or vertical when I cue my clients to use a neutral grip they automatically assume a preferable angle of abduction which I place somewhere less than or equal to forty five degrees. Now when we are talking barbell variations of pressing movements a better cue is to adjust the grip width to allow the elbows to get to a preferred angle of abduction. Anyway the take home message here is that I find a neutral grip when performing dumbbell variations and narrow grip width when performing barbell variations to be more shoulder friendly because it allows for a more preferred angle of abduction between the arm and the rest of the body. This smaller angle places the shoulder in less external rotation and places less stress on the small tiny rotator cuff muscles that your shoulder joint relies on heavily to maintain the humeral head in a stable position against the glenoid. So for the majority of pressing movements I would recommend a neutral hand position. Use a pronated grips sparingly and accordingly. Sorry about not getting an "Exercise of the Week" out last week. The fall school semester started for me and I was focused on getting my routine set, "getting a good start on things", and trying to nail down scheduled time to work on the site. I have got everything where I want it for now so shouldn't have any problems with being regular with this particular series of installments. I was planning on writing this post later this evening, but what often happens I had a client cancel on me last minute, so I decided to seize the opportunity and take the next 20-45mins to bang out this week's "Exercise of the Week". For the most part this series has consisted of nothing except strength training exercises. Now while I have a pretty extensive library of my own regarding this category of exercises I had felt this was a category that a lot of individuals were lacking variety in and could use some help expanding their existing collection. But as I was so kindly made aware of by one of my clients is that people need more help figuring out what they should be starting their training sessions with. I thought this was a great point and felt like an idiot for not thinking of it before hand. I mean I hammer away the idea that every training session should begin with a proper warm-up, yet I have not shared a single exercise suited for warm-up purposes. So I've decided to share over the next few weeks exercises that fit perfectly into a warm-up routine. I personally believe a warm-up should do three important things. 1) it should activate and innervate the muscles that will be worked in the proceeding training session 2) it should mobilize the muscles by taking the fibers through their entire range of motion both contracting and lengthening 3) it should prepare one for movement, preferably specific to the movements that you will be performing in the proceeding training session. I take these three characteristics of a proper warm-up and use them to categorize my warm-up exercises into three categories. Mobilization exercises, Activation exercises, and movement specific exercises. I will be sharing this week's exercise from the mobilization category. This week's "Exercise of the Week" is the split stance adductor mobilization exercise. I just happened up this exercise within the past two months since then it has become a staple exercise in my very own program as well as has been added to a number of my clients AMMP. I love this exercise for a number of reasons 1) it does a fantastic job at stretching the adductor group in a way that many have not experienced 2) it incorporates a hip flexion and extension and personally I think the more I can have my clients work on hip motion the better they will become at it. To perform the Split Stance Adductor Mobilization one will assume a position on all fours with the hands directly beneath the shoulders and the knees directly below the hips. From this position the individual will pick a leg to begin the exercise. Once you have picked your working leg you will extend the leg from its resting ninety degree angle to a straight one hundred and eighty degrees straight out to the side of your body. Your hip and foot will create a straight line that is perpendicular to the rest of your body's position. Once you have assumed this split stance you will begin by sitting your hips back to the heel of the leg that is still positioned at a ninety degree angle below your opposite hip. As you do this you should feel a stretch up the inside on your leg. Once you have reached your full range of motion you will extend the hips back to their starting position and repeat for repetitions. Below are videos of me detailing the exercise from a side and back view. Some Quick Thoughts and Advice for Everyone Who is Making it More Complicated Then It Needs To Be.8/23/2012
"Glue" Exercises Gone Wrong by Tony GentilcorePlease, Please, Please read this article. I have my glue exercises and if you ask me I can name them off the top of my head without a second thought. But the reason I want everyone to read this is often I have been criticized because I use a lot of the same exercises or movement variations over and over again in a program. I know that everyone out their believes they need to be doing thrusters on the bosu ball, but really you don't. The best exercises are the ones that offer the biggest bang for your buck. These exercises are also predominantly the most simple and yet yield the greatest results. Please I urge you read this article and pay extra close attention to the final paragraph as it sums up the point I try to get across to people on a daily basis. Quick and Easy Ways to Feel and Move Better: Installment 14Eric Cressey has been posting a lot of installments in this series that offers fantastic tips on how to move and feel better. These tips are great for the general population because they are simple to implement and cost effective. If you are searching for some great advice checkout this latest installment and the past other 13 posts. You won't be sorry I swear. You will find at least three tips you will use on a daily basis. The Most Powerful Training Tool by Zach Even-EshI love this article by Mr. Even-Esh. It is posted on the new Arnold site so if you haven't yet stick around on the site and read a few of the articles there is a massive amount of great info there. This article does an excellent job discussing how to make your training more consistent and productive. It comes across as simple and common sense solutions but when you really think about what Mr. Even-Esh is saying it is truly profound. Especially considering the dog and pony show of a fitness industry we exist in.
|
 Stevan FreebornHi I am ACSM Personal Trainer who has a passion for spreading the knowledge of healthy living. I will do my best to give you the information you need and want. If there is any topic you wish to know about please ask and I will share my full scope of knowledge on that topic and point you in the right direction to further your understanding. I hope you enjoy the site.  Archives
September 2012
Categories
All
|
 RSS Feed
